

Hi there!
As knitters we are in the privileged position to choose what style we knit as well as the colour and the stitch. We are not bound by high street trends! And we're not always bound by a pre-written pattern :)
As a knitwear designer, I am fascinated by colour, and I love to play around with different coloured yarns; mixing and matching, combining and contrasting.
I recently saw a photograph of a ladies hat on Pinterest which caught my eye. Why? Because of the colours involved. I was instantly inspired to design my own hat using similar colours. See said hat above ^

I often hand knit hats, but this time I decided that a method of knitting called knit weave, which can be done on my knitting machine, would perfectly suit my new hat. (This could be knitted equally as delightful in a hand knit stitch.)
But I had no pattern for my new hat...
So, where to begin? I'll explain briefly. My requirements were...
- I wanted the hat to cover my ears. (I get cold ears!)
- It needed to be a simple, repeatable design. (I may want many hats!)
- Lots of different colours of various thicknesses were to be involved, so exact measurements weren't going to work. (The gauge would change as I added different thicknesses of yarn.)
- Rough measurements and schematics would be fine for this one. (This can sometimes be the joy of knitted fabric as it has the stretch factor!)

So I measured around my head to get the circumference of my hat. I measured over my head from ear to ear to get the approx height. (52cms circum/20cms height.)
I decided to knit according to the length of the circumference in rows. The edges of the knit don't curl so much with knit weave, whereas the top and bottom edges do. So one side edge would form the rim of the hat with no curl. The bottom and top edges would form the side seam.

I also decided to knit around the circumference in two separate pieces so I could get more colours involved.
I knitted two pieces. They both measured the length of the circumference of my head in rows. Put side by side they measured the height that I wanted my hat in stitches.

Then I wanted a circular piece to form the flat top of my hat. I did the calculations and knitted the circle.
The two length pieces were then sewn together. The circle was sewn into this, evenly all the way around. Then the side seam was sewn up.
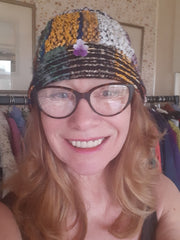 Folding the brim up at the front and securing it with a pretty brooch from my jewellery box that I've never worn as a brooch, but matched perfectly, just finished my new hat off nicely.
By the way, the underside of the knit weave technique on the machine looks just as good as the correct side, so a fold up brim works great!
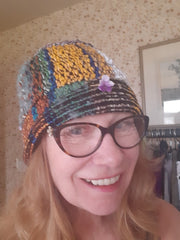
So there you have it! My new hat. Colours all around!
My next one will follow on similar lines, but I'll just knit one length to go around my head (no seam) and I won't change the colours at all...I'll stick with a multiple colour which will be the same throughout. Simples!
Hope you like it :)